Before you can connect a RISC OS computer to a Local Area Network (LAN) and communicate with other computers, including RISC OS ones, you need to setup what's known as TCP/IP on each machine. You also need to configure this if you want to connect your computer to a broadband router.
These instructions give a step-by-step tutorial on how to setup the RISC OS end of things and assume that you're using RISC OS 3.7 to RISC OS 4.02 or RISC OS 5 and above. If you're using Select or Adjust, there are separate instructions.
The example screenshots below come from RISC OS 5 but should still be relevant to RISC OS 3.7 through to 4.02
| 1. | Firstly, make yourself a nice cup of tea and sit down in front of your RISC OS computer. We'll assume that you may have one or more RISC OS computers that you wish to network, so just follow these instructions for each machine simply changing the relevant IP address and host names. |
| 2. | Double-click on !Boot to load the configuration setup. |
| 3. | Click on Network. This should open a small Network configuration window containing three icons (fig.1).
N.B.If you're using RISC OS Select, click here for a RISC OS Select version of these instructions.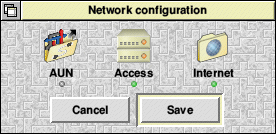
Fig.1 |
| 4. | Click on the AUN icon and make sure the 'Enable AUN' icon is turned off (ie. no tick) and click 'Set'. |
| 5. | Click on the Access icon and make sure 'Enable Access' is ticked ON. Click 'Set'. This will enable ShareFS so that you can share drives on any RISC OS machines connected to your network. If you don't want to share discs between multiple RISC OS machines, you can turn this off (untick). |
| 6. | Click on the Internet icon. This opens the Internet configuration window (fig.2) which is a bit more complex.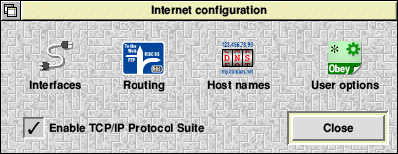
Fig.2 |
| 7. | Firstly, ensure that the 'Enable TCP/IP Protocol Suite' is turned on by clicking on it's icon if neccessary. |
| 8. | Click on the Interfaces icon. This will open the Interfaces window and you should find that your relevant network card is ticked. In the example here it says "Intel PRO/1000", which is the default network card in the Iyonix, but yours might be different. |
| 9. | Click on the Configure icon (to the right, fig.3) and a network card configuration window should open.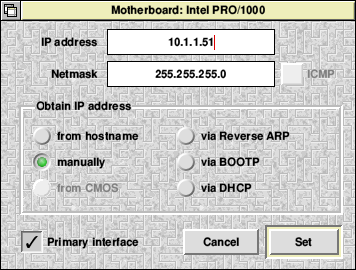
Fig.3 |
| 10. | You need to enter an IP address in the relevant icon. This should be unique for each machine* on your network. If running a home network, a recommended value would be 10.1.1.x - where x can be pretty much any number you like, between 1 and 255. The test Iyonix here to 10.1.1.51
Note that if you want to communicate with a broadband router, it may have come set with an IP address of 192.168.1.x - in which case you need to use 192.168.1.x for the computer, as all devices need to be on the same network in order to 'talk' to each other. If the concept of IP addresses confuses you, there is a separate page which gives a bit of background into IP addresses and networking in general.
* Technically, it should be unique for each network card, as some computers can have more than one network card fitted to them, but most RISC OS machines just have the one, so we'll assume that each machine will have a single IP address. |
| 11. | Set the Netmask to 255.255.255.0
Again, the reasons for this are explained in more detail in our TCP/IP for beginners article. |
| 12. | Underneath these two settings there should be a box labelled 'Obtain IP address' and six selectable icons. Make sure the one labelled 'manually' is ticked and all the others are off. |
| 13. | Ensure that the 'Primary interface' icon is ticked. |
| 14. | Click 'Set'.
N.B. The settings described above are ones that work ok on my network. Obviously if you are planning complex network setups or gateways to other networks, some values may need to be different. However, if you are setting up extensive networks (as opposed to getting a simple network talking between a RISC OS machine and a PC) getting a book on TCP/IP addressing, which explains what all the various Netmasks, IP addresses and other terminology mean, would be advisable. If you just follow these instructions you should be able to get a simple network up and running without too much trouble. |
| 15. | Having clicked 'Set', click 'Close' on the Interfaces window. |
| 16. | Now click Routing in the Internet configuration window (fig.4). This doesn't need to be used in a simple network between local computers, so you can just confirm that the Gateway icon is blank and all the options are turned off.
N.B.If you're connecting to broadband and you have a router, you should set the gateway to the IP address of your router (in the example here, 10.1.1.1 but may be 192.168.1.x depending on your router).
Fig.4
Click 'Set' to close the window. |
| 17. | Back in the Internet Configuration window, click on Host names. This opens a largish Host names window (fig.5) containing a number of writable icons.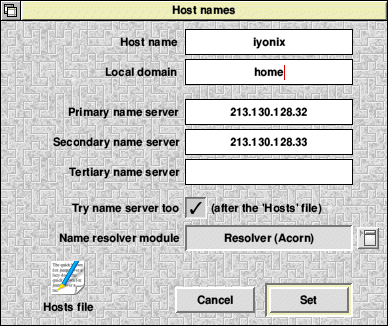
Fig.5 |
| 18. | Ensure that the 'Try name server too/Use name servers also' option (towards the bottom) is ticked, or else several of the following icons will be greyed out. |
| 19. | In the 'Host name' icon enter a name by which your computer will be known on your network. This can be an English name that you can remember. I've called my Risc PC "Arthur" from the legends of King Arthur. Another naming scheme could be names of the Solar System planets, Tolkien characters or something else. In the example here, I've been boring and just called the Iyonix 'iyonix'. Each computer on your local network needs a unique name.
N.B.Some email clients add the hostname to email headers, so you can always enter something like "Anonymous" if you don't want anyone else to know your hostname. |
| 20. | For the Local domain enter a name for your local area network (LAN). I'd recommend something like "home"
Some people recommend putting your ISP domain here, such as orpheusinternet.co.uk but I've found that home works just as well, and it's more anonymous. |
| 21. | The Primary name server should be set to the same IP address that you entered in step 10. Thus, in this example set to 10.1.1.51 UNLESS:-
N.B. If you're connecting to a broadband connection, you should set the primary and secondary name servers to those provided by your ISP. Some people recommend setting the primary name server to that of the broadband router itself (which you can do), but my personal preference is to use the ISPs name servers directly. |
| 22. | The Secondary name server can be set to your ISPs secondary name server (or left blank if you're not connecting to the internet on this computer) and the Tertiary name server can be left blank, or you can enter the IP address of your local router if you've used your ISPs name servers for primary and secondary name servers. |
| 23. | Set the Name resolver module to "Resolver (Acorn)" via the small menu icon to the right of the main icon. |
| 24. | Double click on the 'Hosts file...' icon in the bottom left corner. This will load the Hosts file into a text editor so that you can manually enter all the machines connected together on your network. |
| 25. | Scroll right down to the bottom and it should end in a line saying something like 127.0.0.1 loopback localhost loghost |
| 26. | At the end of the file enter the IP addresses (as entered at step 10) and host names (as entered at step 19) for each computer that you're linking together. Each entry should be on it's own line. My hosts file looks like this;
127.0.0.1      loopback localhost loghost
#
10.1.1.50      Merlin
10.1.1.51      Iyonix
10.1.1.52      Excalibur
10.1.1.53      Archimedes
10.1.1.54      Avalon
10.1.1.55      Gandalf
10.1.1.56      Netbook
10.1.1.57      Lancelot
10.1.1.60      Arthur
10.1.1.75      Router
Each IP address and host name should be seperated by a single TAB character.
The purpose of the Hosts file is explained in a bit more detail on the introduction to TCP/IP networking page. |
| 27. | Close and save the hosts file. |
| 28. | Click 'Set' in the Host names window. |
| 29. | Click 'Close' in the Internet configuration window (no need to worry about the 'Open !Internet' and 'User script...' icons). |
| 30. | Click 'Save' in the Network configuration window. The computer will now ask you if you want to reset the computer in order for the settings to take place. Reset the machine and the RISC OS TCP/IP side of things is now set up correctly. |
| 31. | You can repeat the steps above for each RISC OS machine on your network. |
If you wish to add a comment to this article, please use the form below. Please note that by submitting comments using this form you are allowing all of the information submitted to be visible on this website. Your comment will be published immediately, so please proof-read before you add. Any comments deemed to be abusive or irrelevant to the topic of the article may be removed without warning.