
It is relatively easy to connect a RISC OS computer and an Apple Mac together so that you can transfer files back and forth between them. I have experience of networking both Mac OS 9 and Mac OS X machines together. However, these instructions assume you have upgraded to the latest version of Mac OS X - Leopard. If you're using OS X Tiger, then there are some separate instructions at www.riscos.org/networking/tiger.html
Both machines should be linked via ethernet and both machines should be running TCP/IP which is the standard protocol for communicating via a local area network (LAN).
For the process of transferring files back and forth, I've found that the easiest way of obtaining this is to send files via FTP from the RISC OS end. This effectively means running an FTP server on the Mac and using an FTP client on the RISC OS computer in order to transfer the files.
Mac OS X has everything you require built-in as standard. On the RISC OS computer you will require an FTP client, for which I recommend Colin Granville's FTPc application which is free and available to download from http://ftpc.iconbar.com
1. Configure the RISC OS machines via my RISC OS TCP/IP configuration page.
We will now look at configuring Mac OS X so that we can run FTPc on the RISC OS machine and connect to the Apple.
Everything you need to do to setup Mac OS X to talk via TCP/IP can be controlled via the 'System Preferences' Internet & Network settings.
1. Load the System Preferences by clicking on the switch icon on the Dock bar (see below)
This will load the System preferences and display the various configuration options. Click on Network. A complicated looking window will open displaying a location and various technical looking settings.
2. First off you want to create a location for your settings. This allows you to easily switch locations, which is more useful if you have a Mac laptop and may want to connect to different networks, but even if you only use your Mac at one location it's worth creating a specific location for your settings. Click on the Location icon and a pull down menu will open. Select New Location...
3. You will be presented with an entry box so that you can name your new location. Call it Home (LAN) or something and click OK.
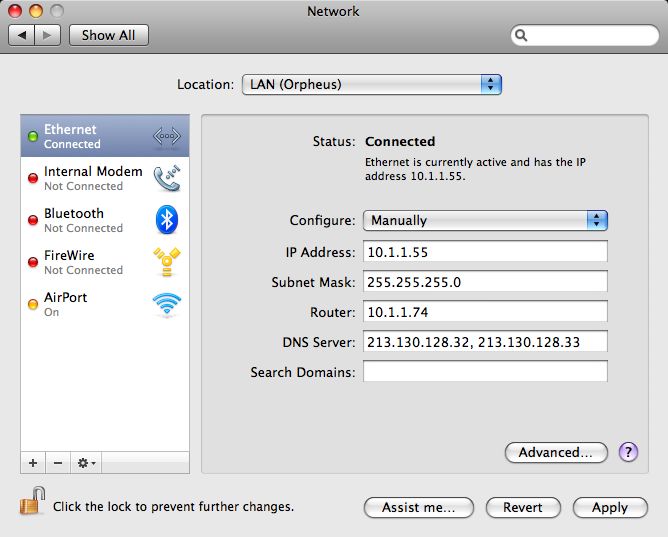
4. On the left hand side of the Network settings window is a panel showing which network methods/devices are available. This will generally be Ethernet, AirPort, Modem etc (depending upon the hardware installed in your Mac). Click on the Ethernet option and you should get a window similar to that shown in the screenshot above.
5. Each interface that is installed in your computer will have an accompanying coloured LED to the left, showing the status. Any that are green are connected successfully. Any that you don't require for this Location or setting can be deleted by highlighting the relevant option and clicking on the '-' (minus symbol) at the bottom of the panel. Simply go through each one disabling ones that aren't used, or you don't with to configure in this Location. You need to ensure that the Ethernet one is enabled though.
6. Select the Manually option from the Configure drop-down menu. For home networks, I'd recommend having a specific, or static, IP address for each computer. This is slightly more complex to initially setup but is easier to maintain once everything is completed.
7. Now enter the IP address you require for your computer in the IP Address box. This should be something like 10.1.1.55 ensuring that the first three numbers are the same as those configured for your RISC OS computer. The fourth number should be unique within your network.
8. Enter 255.255.255.0 in the Subnet Mask box.
9. If you're just connecting the Mac to the RISC OS machine, you can leave the Router and DNS Server boxes blank. However, if your Mac is also connecting to the internet you need to enter the IP address of your router in the Router box and the name servers of your ISP in the DNS Server box. In the example screenshot above, my router is set to 10.1.1.74 and the name servers are set to those of Orpheus Internet.
10. In normal useage you don't need to worry about the Advanced settings, so you can simply click Apply to set the options and save for future use. At any point, these settings can be selected just by selecting a 'location' from the Location submenu on the main Apple menu (very top left of the screen).
Once you've configured all your TCP/IP settings, you need to ensure that your Mac computer allows other people to connect via FTP. This is because Mac OS X has a built-in firewall, which can prevent connections from other computers.
Click on the Show All button at the top of the Network settings window, which will return you to the System Preferences window. Now click on the Sharing icon to open the Sharing configuration window (see screenshot below).
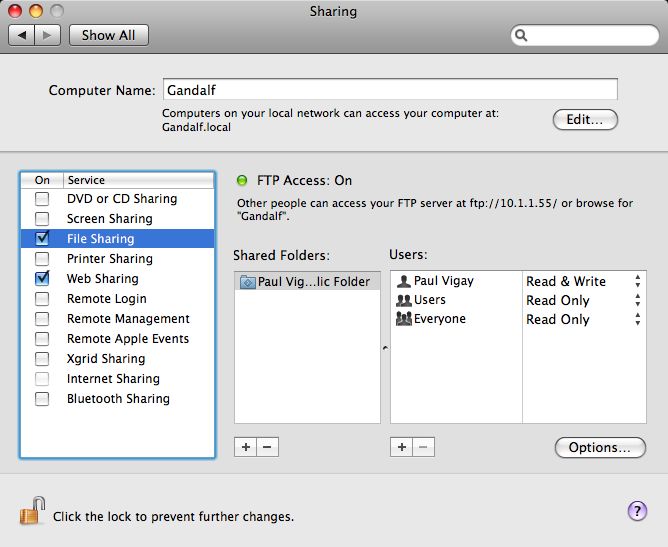
Within this window you should see a service called File Sharing. Make sure this option is ticked, and it will enable other computers to connect via FTP. A green LED should appear on the right hand side, along with brief instructions as to how other people can access your computer.
However, before you can access your Mac via FTP you have to set the 'sharing protocol', so click on the Options button in the bottom right corner. This will open another window panel (fig.4) showing the various protocols available.
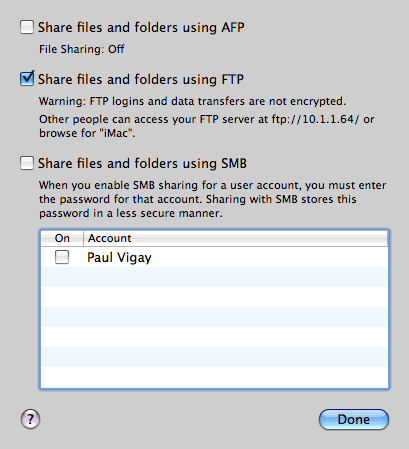
Ensure that the Share files and folders using FTP option is ticked (fig.4) and then click Done
You can now close the System Preferences window as your Apple Mac should be correctly setup to allow file transfer via FTP.
There are two ways of accessing the Apple Mac harddrive from the RISC OS computer; FTP (the easiest and more compatible) and AppleTalk (if you've got RISC OS Select or Adjust)
Load FTPc on the RISC OS computer and click Select on the FTPc icon. It should open a connection window.
You only need to enter three values in this window in order to connect to the Apple Mac. Enter the IP address of the Mac in the Host box. If you've used the values I've recommended above, this will be 10.1.1.55
Leave the Path blank, and enter your Mac OS X username into the User box.
The Mac OS X username will either be a user you've created on the Mac, or (if you haven't created any users) the administrator user that you entered when you very first purchased your Mac, or installed Mac OS X.
Enter the relevant password into the Password box.
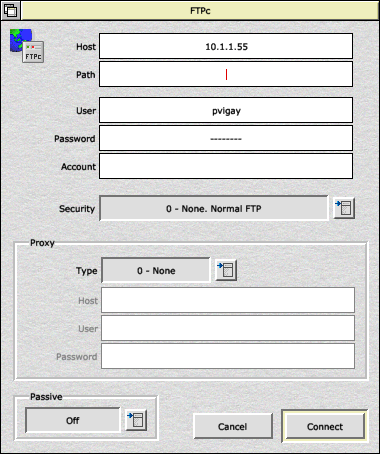
Proxy should be set to None and Passive should be Off.
You should now be able to click Connect and, if all is well, a window will open containing the Home directory of the Mac OS user you've just logged in as (fig.5)
You can now drag files back and forth using the usual RISC OS drag and drop method.

I hope to complete this section soon. Please check back later.
I hope this article is of use to you, but please feel free to contact me if you can't understand any part of these instructions, or if you feel that anything could be explained a bit better.
|
Last edit: 10th Apr 2016 at 4:55pm (3486 days ago) |
|
| ||||||||||
|
| ||||||||||||||||||||